Sunday 25 December 2011

Ghost in the Church

For Christmas, I received a new graphics card.  NVIDIA GeForce GTX508,  with 3Gb RAM and 512 CUDA cores!  Blender can offload the rendering to the GPU.  A test render that took over 9 minutes using my Intel Core 2 Quad CPU, takes only 51 seconds on the new GPU.  This makes an amazing difference with real-time feedback when tweaking textures.

Here is a test scene that I was not able to make look good using CPU only rendering,  I couldn't get the ghost texture right using trial and error and having to wait for feedback.


And another super-fast render.  This time of a midge, I previously gave up tweaking the textures on this one as it took several minutes to see the effect of any changes.  Not now :)

Sunday 27 November 2011

Blenderella - making progress with rigging and texturing

An update on my Blenderella model.  As previously posted, I followed the excellent Blenderella follow-along DVD from Angela Guenette.  I am happy with the model but have had some abortive attempts at rigging her for animation.

Using the rigify script. I finally completed the rigging.  I am now tweaking the weight painting at different poses.   The body is fully rigged but I now need to find a good face rig also.

I also made a start on UV Unwrapping and texturing, and converting my placeholder textures to Cycles.


Blenderella, taking shape.

For comparison,  here is the previous post.

Wireframe

Monday 21 November 2011

A Wee Dram

Another tutorial on using the Blender Cycles render engine.  I am really amazed at how well glass and liquid's turn out using near default settings.

This image created following Andrew Price's tutorial on BlenderGuru.com.

A Wee Dram anyone?

Sunday 20 November 2011

Barrels of fun

The great thing about using an open source application for creating 3d content is that updates get released frequently, and I get to play with them even before fully released.    But also the worst thing is that updates get released frequently, and I need to learn how to use them all over again!

There has just been some major updates to Blender, available from GraphicAll.org,  materials work in a completely different way,  the render engine has been revolutionised, camera tracking and dynamic paint plus other goodies from the summer coding efforts.

This is my first serious attempt to re-learn how materials work.

Following a tutorial on BlenderCookie.com by Jonathan Williamson. 

Barrels
Wireframe of the layout


New Material Node set-up for the Cycles Render Engine

Wednesday 16 November 2011

CyberNat

Scottish Politics is an interesting place these days with an ongoing battle for the minds of the population between the mainstream media and bloggers.   The phrase CyberNats (Cyber Nationalists) was coined to refer to online bloggers who challenge the storyline being pumped through the established news channels. 

Without going too political on here, I liked the imagery of a CyberNat, here is my interpretation based on the dreaded highland midge.

CyberNat
CyberNat fuel

Saturday 5 November 2011

City Generator - take 2

Arrrg, I have no time to do this properly.  A 2nd attempt at a city scene using the City Generator.


There are obvious problems with this render.  But I need to go pack my bag for tomorrow morning's flight!

The fog effect is not effecting the reflection in the loch, I know, I know.  To be fixed later.

Lochside Apartments


Plug in details:  Suicidator City Generator 0.5 Pro

Tuesday 1 November 2011

City Generator

I've been pretty busy at work,  no time for creative stuff.  I did receive a city generator plug-in I pre-paid for a month or so ago,  and then forgot about.  I was pretty happy to get the e-mail with the attachment. This is my first try using it. 

1st City Scene, very quick and easy.  Only an hour to get to this stage.
This is the raw output from the plug-in with minimal tweaking.  A bit of defocus to hide the worst of the texture shortcomings.  I hope to play with it some more after I get the next couple of business trips out of the way.

Plug in details:  Suicidator City Generator 0.5 Pro

Monday 26 September 2011

Autumn Pool

Inspired by the colours starting to appear on the trees, I created an autumn (fall) scene with a forest pool.

There are a huge number of vertices in this scene,  it really pushed the limits of what my workstation is capable of.

Edit: 1st October.  There were some problems with the lighting that I was not happy with.  In the original, the light and dark on the tree trunks and branches did not match up with the direction of the sunlight.  I have been travelling and not able to get back to my PC to update.  At last, an updated version,  the original is below for comparison.  Click the images for a larger version.

Autumn Pool


Before final adjustment to light levels and adding 2x bounce lighting
   
And the original version....

Issues with sky-lighting on the branches and trunk

Monday 19 September 2011

Latest Project - Female character

A work-in-progress shot of a female character I have been modelling.  This is part of a follow-along course from Blender.org,  produced by Angela Guenette.


A bit different from the Nature Academy material I have been posting so far.

This is not yet complete.  Most of the modelling is done, I have only created place-holder textures and I plan to rig her for animation.


A couple of additional shots:


Sunday 18 September 2011

Mountain Loch - Revisited

I was quite please with my Mountain Loch image, and posted it to BlenderArtists.org. I got some really good comments back about the scaling of the trees v's the mountain and did some updates.  I also received some suggestion to try different focal lengths on the camera settings.

I am not a photographer and pretty clueless about the camera settings.  After a bit or research, I find that lower focal lengths give a wide angle, while longer focal lengths give zoom.  After a bit of experimentation, I have two new versions of the mountain scene.

Mountain Loch v2 - 90mm focal length "zoom"
V2 differs from the previous post in that I added lots more trees (about 500 for the scene) in an attempt to sell the scale of the (small) mountain.  The scene reminds me of the small islands on the west coast of Scotland more than some monster mountain.  It was never intended to be the Matterhorn :)

Mountain Loch v3 - 23mm focal length "wide angle"
The wide angle shot in V3 is very unforgiving on poor foreground detail,  I added some grass coming through the snow,  without this, your eye has nothing to settle on in the foreground and it is too easy to pick fault with the close-up parts.

Saturday 3 September 2011

Toadstools in the Forest


The Week 9 theme for The Nature Academy is a misty forest scene.  I deviated from the tutorial quite a bit to get the look I was after, I used my own backdrop and made my first seamless texture for the ground.  The toadstool idea came from a family walk a couple of weekends ago, the reference photo is below.

Edit:  A slight tweak to the foreground plants. Original is below.

Toadstools in the Forest


Original - tweaked the foreground foliage


Here is the reference pic for the toadstools:


For my fellow students at The Nature Academy,  here is the backdrop image and ground texture.

Modelling and layout


Let me know what you think?

Saturday 27 August 2011

Mountain Loch

Week 8 is modelling and texturing a snow-covered mountain.   A lot of people have been sticking strictly to the tutorial settings, there are a lot of identical looking mountains out there. Here is my attempt to do something a little different.

Click on an image for a larger size.

Edit:  tweaked the water edge and repositioned the camera a little.

Mountain Loch


I did the original mountain tutorial while it was available as a taster session for The Nature Academy.  I have dug out my old render for comparison.  We need to name this mountain - "Mount Andrew".

Mountain Loch - take 1

Mount Andrew

Saturday 20 August 2011

Seascape

Week 7 of The Nature Academy,  seascape.

EDIT:  The animation has finished baking, here is the video:


The basic modelling for the sea surface was surprisingly easy, using the Ocean Generator.  However. the tutorials did not cover creating the illusion of distance over the sea surface and produced a bumpy horizon.  That is ok for a shot taken at water level or rough seas but not for a camera placed more than about a meter above the surface.

After a lot of trial an error, I found that using a lattice on top of the generated ocean surface allowed the mesh to be flattened as you get further from the camera and stretched to create some real distance and fill the camera view.

Seascape in Blender
Note: I tried animating a shark fin cutting through the water but until I figure out how to have that interact with the surface, it looks too fake to post just yet.

Here is the lattice set-up:

Lattice set-up to flatten horizon
  1. An inner 2x2 lattice covering the ocean mesh.  After the lattice modifier is added to the ocean,  scale the back edge on the Z axis to zero.
  2. An additional outer 1x1 lattice added to the ocean mesh under the 1st lattice modifier.  This allows you to scale out on the X axis to fill the scene.
  3. After the lattices have been created, the ocean mesh can be moved and rotated to avoid repetition showing up in the view.

Monday 15 August 2011

Thistles

Thistle
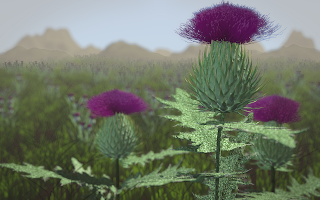
I adapted the week-6 tutorial and modelled some thistles.  The head and spikes on the bulb are both particle systems,  the leaves have both modelled spines and a coating of particle spines.

I thought the scene suited mountains as a backdrop rather than a tree-line and I really like the fog effect.  Edit:  I really hate the fog effect


Let me know what you think?

Also, this is the reference image for the leaf, I still have not got this quite right.  Edit: reasonably happy with the leaves now.


Hmm, another EDIT,  leaves not quite right.  Original below, new one above.


Light fog - this is better:


Edit:  After sleeping on it, I didn't like the heavy fog so much.  The original is below, I replaced the image above with a new one.


Full fog:

Thistles

Saturday 13 August 2011

Week 6 - Flowers

Week 6 result - modelling daisys!

I might give a prize for the correct number of bugs in the picture.

Daisys

Created in week 6 of The Nature Academy at BlenderGuru.com

Saturday 6 August 2011

Compilation video

Having a lot of fun with the video editor in Blender,  this is what I produced with my Nature Academy work with some sound effects from freesound.org and music from ccmixter.org.


Week 5 - The Loch

Been away for work most of the week,  managed to get some catch up done on week 5.  Here is my still image of the Loch.


I am still working on an animation.  Getting the ripple speed correct has been a challenge and also stopping my lilly-pads jumping out of the water or flickering.  All anti-aliasing is turned off for the animation.  I think it still works (and much faster to render).


Experimenting with transparency of the water seems to help but significantly darkens the scene - here is a still:

Friday 29 July 2011

The Nature Academy, Week 4 - Plants

Here is my coursework for week 4, modelling plants.


Created using Blender plus an Ivy Generator and following The Nature Academy at Blenderguru.com

I tried to go a little beyond the coursework by adding additional plants in the mid-ground to improve blending with the background and tried to create some openness and depth to the scene.

Edit:  Added this into an animation:


Edit: Fixed the ivy leaves pointing in the wrong direction.  Separated the plants in the mid-ground onto its own render layer so that the colour and alpha could be blurred to better match the background.  Previous version below for comparison.


Edit:  Fixed some issues with the mid-ground textures having a weird effect against the backgound and updated the main image above.  Also added more mid-ground height and a very slight fog to help blend with background.  Original is below for comparison ...

Monday 25 July 2011

The Nature Academy week 3 - Trees, final - FINAL

Hmm,  I couldn't leave it,  I moved the Scots Pine much closer to camera and increased the grass.  I am much happier with this version.


Note:  click on any of the pictures on this site for a larger version.

Edit:  one last tweak made,  fixed a texture issue on the pine,  scaled the foreground heather up a bit, added roots to the pine, made the scree a bit darker. 

Saturday 23 July 2011

The Nature Academy week 3 - Trees, final

Phew, this one pushed my PC to it's limits.  Finally there.

The Last Tree in the Forest
Biggest difficulty was figuring out how to separate the tree to it's own render layer and then re-integrate it properly back into the scene.  I also had a repeated crash when trying to work on the compositing nodes.  I updated Blender from 2.57 to 2.58a and it sorted the problem.

Week 3 of The Nature Academy - Trees

I have always wanted to create a mountainside covered in heather in Blender.  So I used this weeks tutorial to create heather in Arbaro, import it into Blender and add materials and textures.  I didn't think I would get away with a small shrub as my tree project, so I also created a scots pine in Arbaro.  One problem, Arbaro won't let you control the distribution of stems on a branch.  I ended up creating two models for the tree.  One for the main trunk and branches and another for the smaller branches and needles, and fitting it all together in blender.

For the image, as well as the heather (foreground), I also had a field day with particle systems for low poly heather (an instanced model with about 40 verts), scree and grass.  I used weight painting to control what went where.

Here is the result:

The Last Tree in the Forest
Comments very welcome.

Update:  I am really struggling with the components of the image here.   I put the tree on a separate render layer to avoid it being influenced by the sky bleed on the mountains.  Now I am having to do extra tutorials to figure out how to re-incorporate it back into the scene.  And I still have glow-in-the-dark grass!

Thursday 21 July 2011

Messing about with Arbaro

Getting to grips with the Arbaro programme. This looks pretty powerful, especially when adding textures and modifiers for close-up work.

Experimental heather in Arbaro.


Here are the settings:
<?xml version='1.0' ?>

<arbaro>
  <species name='Calluna vulgaris'>
    <!-- general params -->
    <param name='Shape' value='2'/>
    <param name='Levels' value='3'/>
    <param name='Scale' value='1.0'/>
    <param name='ScaleV' value='0.1'/>
    <param name='BaseSize' value='0.1'/>
    <param name='Ratio' value='0.0080'/>
    <param name='RatioPower' value='1.0'/>
    <param name='Flare' value='1.5'/>
    <param name='Lobes' value='4'/>
    <param name='LobeDepth' value='0.0'/>
    <param name='Smooth' value='0.5'/>
    <param name='Leaves' value='200'/>
    <param name='LeafShape' value='disc4'/>
    <param name='LeafScale' value='0.01'/>
    <param name='LeafScaleX' value='0.5'/>
    <param name='LeafQuality' value='0.3'/>
    <param name='LeafStemLen' value='0.1'/>
    <param name='LeafDistrib' value='3'/>
    <param name='LeafBend' value='0.3'/>
    <param name='AttractionUp' value='1.5'/>
    <param name='PruneRatio' value='0.0'/>
    <param name='PrunePowerLow' value='0.5'/>
    <param name='PrunePowerHigh' value='0.5'/>
    <param name='PruneWidth' value='0.5'/>
    <param name='PruneWidthPeak' value='0.5'/>
    <param name='0Scale' value='1.0'/>
    <param name='0ScaleV' value='0.0'/>
    <param name='0BaseSplits' value='0'/>
    <!-- level 0 -->
    <param name='0DownAngle' value='0.0'/>
    <param name='0DownAngleV' value='0.0'/>
    <param name='0Rotate' value='0.0'/>
    <param name='0RotateV' value='0.0'/>
    <param name='0Branches' value='5'/>
    <param name='0BranchDist' value='0.0'/>
    <param name='0Length' value='1.0'/>
    <param name='0LengthV' value='0.0'/>
    <param name='0Taper' value='1.5'/>
    <param name='0SegSplits' value='0.0'/>
    <param name='0SplitAngle' value='0.0'/>
    <param name='0SplitAngleV' value='0.0'/>
    <param name='0CurveRes' value='5'/>
    <param name='0Curve' value='10.0'/>
    <param name='0CurveBack' value='10.0'/>
    <param name='0CurveV' value='100.0'/>
    <!-- level 1 -->
    <param name='1DownAngle' value='80.0'/>
    <param name='1DownAngleV' value='0.0'/>
    <param name='1Rotate' value='55.0'/>
    <param name='1RotateV' value='0.0'/>
    <param name='1Branches' value='20'/>
    <param name='1BranchDist' value='1.0'/>
    <param name='1Length' value='0.9'/>
    <param name='1LengthV' value='0.0'/>
    <param name='1Taper' value='1.5'/>
    <param name='1SegSplits' value='0.0'/>
    <param name='1SplitAngle' value='10.0'/>
    <param name='1SplitAngleV' value='0.0'/>
    <param name='1CurveRes' value='8'/>
    <param name='1Curve' value='20.0'/>
    <param name='1CurveBack' value='-45.0'/>
    <param name='1CurveV' value='120.0'/>
    <!-- level 2 -->
    <param name='2DownAngle' value='10.0'/>
    <param name='2DownAngleV' value='0.0'/>
    <param name='2Rotate' value='60.0'/>
    <param name='2RotateV' value='10.0'/>
    <param name='2Branches' value='20'/>
    <param name='2BranchDist' value='1.0'/>
    <param name='2Length' value='0.9'/>
    <param name='2LengthV' value='0.0'/>
    <param name='2Taper' value='1.5'/>
    <param name='2SegSplits' value='0.0'/>
    <param name='2SplitAngle' value='0.0'/>
    <param name='2SplitAngleV' value='0.0'/>
    <param name='2CurveRes' value='6'/>
    <param name='2Curve' value='2.0'/>
    <param name='2CurveBack' value='20.0'/>
    <param name='2CurveV' value='50.0'/>
    <!-- level 3 -->
    <param name='3DownAngle' value='30.0'/>
    <param name='3DownAngleV' value='0.0'/>
    <param name='3Rotate' value='120.0'/>
    <param name='3RotateV' value='0.0'/>
  </species>
</arbaro>

Wednesday 20 July 2011

Nature Academy Week 3 - Trees

Week 3 coursework from The Nature Academy is trees using Arbaro, a free tree generator.  Following the tutorial, I added the large oak-like tree on the left.  I then tried using the software to create heather for the bottom left.  The tree is really good,  I am less happy with the heather, I will need to continue experimenting.

Coos in the Glen

Tuesday 19 July 2011

The Nature Academy - Week 1 assignment, Grass

I've signed up to The Nature Academy from BlenderGuru.com, a nine week course on modelling nature in Blender.  There are weekly assignments, the first of which is modelling grass.  Here is my attempt:


Titled: Coos in the Glen.
An attempt at animating the grass scene.  There was a lot of trial and error with this one,  the camera speed was tricky to get right.  I ended up cheating by repeating the first 14 frames to pad out the start.  It would have taken too long to re-render.  Almost 24hrs of render time to get these 215 frames / 9 seconds of video.


Title: Coos in the Glen, the movie.

The Nature Academy, week 2 - Rocks

Here is my submission for week 2 of the Nature Academy (www.blenderguru.com).  I have modeled the rocks in the foreground and formed them into a cairn.

Titled: The Cairn